Sunday, April 23, 2017


Well Hello lovely Unies!

Thanks for joining in the blog hop this week.  I'm so honored you are spending some of your time with me and the other Growing In Unity Girls.  If you are unsure where you are in the hop:


Annie Sterner (You are HERE) 


For your viewing pleasure, I have created a little No-Line coloring tutorial using the stamp kit  Violet Girl.  I just love her face and braided hair!  So, you may be asking... "What is the no-line coloring tutorial in which you speak? "  Well, it's just a way in which you color your image that give the appearance that  there are little to no stamped line.  Gives it that hand painted look. In reality, I like this technique because it makes me appear to be a semi-decent artist, when all I do is color in the lines!  Sneaky right?    Just keep in mind when selecting your image of choice that the key to a successful no-line technique is maintaining detail.


 I first stamped the image using Tim Holtz  Antique Linen distress ink.  I use this ink because it's water-soluble. When you apply color using watercolors ( marker, paint, or liquid) the lines will blend with your pigment giving the image a painted look.  You may be able to achieve the same look with a non water-soluble ink, but it needs to be very light, and it needs to not smear when in contact with water.


I next painted Violet Girl paying close attention to my water control. You don't want everything blending together giving it a muddled appearance.  Remember, to let things dry so the pigment doesn't run together.You may lose some detail, but that's ok.  Just keep the main details defined.  You can see, I may have lost some of the details of the flower, but for an image of this size it works.


After I colored Violet girl, I added some texture to the surrounding paper by using a Tim Holtz stencil #THS006 and some Smoked Gray distress ink.  Lastly, .  I used an old 6x6 pad by My Mind's Eye called "The Sweetest Thing".

It's a pretty basic card, but I wanted to demonstrate how easy this look is to achieve!


Thanks for joining in some Unity Fun.  Next down lane is Renee Moran.  Remember to leave some Uni love on ALL the blogs you visit, it's your ticket into the contest from some fun Unity Goodies.

Toodles-
Annie

Thursday, March 9, 2017

Well hello- fancy meeting you people here! A couple of you asked for a tutorial on how I made this card, and it's a good thing you are cute, because otherwise I would have told you to suck it.


I'm telling you, it's a super quick card to make.  10-15 minutes tops. The less precise you are the better.  However, if this takes you all day, and you want to fret over coloring in the lines.. I say, wonderful!  You do you.


Listed below are the supplies that I personally used, But, you use what you have.  Make it work!

  • Unity Stamp set:  Rebuild Your Life  (SWOON!!!)
  • Versafine Onyx Black (waterproof ink is important)
  • Master's Touch 140 lb Cold press watercolor paper (the smooth side). I use the 4"x6" watercolor pad. Any brand watercolor paper would do.  Hot press paper would work equally well.  I will say, you really want to use watercolor paper because we will be laying down some pretty wet washes to build layers
  • Watercolor- I use Mission Gold.  Colors are a blend of the following: Lemon Yellow, Yellow Orange, Orange, Cerulean Blue, VanDyke Green, Yellow Green
  • 1" flat brush, #12 round, #4 round
  • White Embossing Powder or not, gold would look lovely, or a blue too.
  • Uniball Signo White
  • Stampendous Fran-tage in Shabby White and Aged Gold (optional)
  • A Roll of paper towel (I want to say it's Bounty, but it's pure white, with no texture to it) If you have some embossed paper towel, you can use that too, you'll get some cool textures when you lift the pigment up off the paper.
  • Heat Gun
  • ATG adhesive
  •  Mother *&^% Glossy Accents (that stuff is great but drives me crazy by the all the clogging.) Yes, I've stuck a pin in it.. no that does not work that great.  Yes, I bought the fine tip nozzle, no it doesn't not work that great.  But, I use it anyway and No I don't want to talk about it anymore!)
My process in 10 easy steps or less!

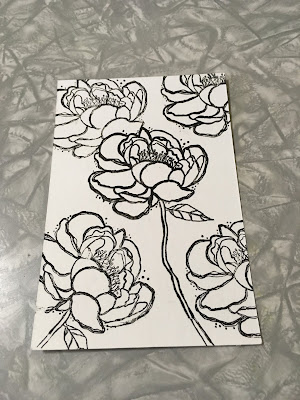
1. I first stamped my main focal image center of card.  Then I used the backing sheet (that protects the cling film on the back of the stamp) to create a mask, in order to stamp the upper left image to make it appear that it's behind the focal flower.  I repeat stamping until I got the card design I wanted.


2. Using my 1" flat brush, I completely cover my cardbase in clear water.  You don't want it puddling everywhere kind of soaking wet, but nice and damp.  While that was soaking into my paper,  I mixed a loose wash of the Cerulean Blue and VanDyke green, remember, the more water, the more light and translucent the pigment will be. You decide the level of vibrancy you want.

I then added the blue/green paint in between the flowers. Because the paper is damp, and you are using a wet on wet technique the pigment will flow around and make some interesting blooms. While the paint was still wet, I added in spots of Yellow Green pigment to give the background some variation. You don't have to worry if some of the background color covers some of the petals, it's the looseness of the paint that you want. Go ahead and color any leaves while you have the blue/green mixture prepared.  I then heat set my background.  Sure you can tape the paper to a board, or glass cutting board.  But, not really that important here.  I'll show you how to fix any curling later.


3 After the background is dry, I made another loose wash of the Lemon Yellow, with just a touch of the Yellow Orange added to create a light peachy color. Then using my #12 round watercolor bush, I added clear water over each of the petals avoiding the background where possible.  I followed the clear water application with the peachy color loosely over all of the petals in each of the flowers, thus creating the highlighted portions of the petals. It's ok if you leave some white areas, that adds depth.

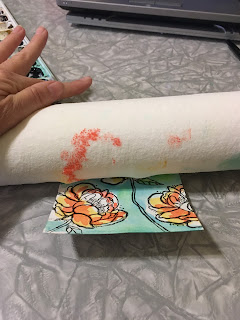
I then took my roll of paper towel and going in one direction (bottom to top) I rolled over the card base.  This soaks up any puddles you may have created.  Why do that you ask?  I don't want my flower petals completely dry, just the excess paint picked up. We still are working in a wet on wet application here. Even though the paper isn't soaking wet, the pigments are still getting down and funky with each other.  It's a great technique if you find the pigment is a bit too vibrant for your liking.


4  Now, I want my focal image to have more contrast, so I  added some straight orange to the shadow parts of the flower, using my #4 round brush. I wanted more precision here, so a smaller brush works better.  But, not necessary. just tread carefully with your larger brush. So, I added my shadow color pigment to the base of the petals and where petals may overlap.  Nothing to detailed. Just here and there. While the pigment was co-mingling.. I also took my Uniball Signo white pen and added some dots around the flower, just for some texture. But, I'm not sure it added any measurable impact.  


5.  Now I broke out my heat gun.  Dried the crap out of it.  You can see it curled like mad.  What?! You are so crazy Annie!  Really, I promise it's easy to fix.  Flip it over.  Give it a good wet wash with water (use your big brush, or I use my spray bottle)  and dry the back with your heat gun.  It wants to flatten out.  It NEEDS to flatten out.  In stubborn areas you can add some more water and stretch the paper with your hands to encourage compliance.

And, let's be real here.  I'm using cheap watercolor paper. It's not going to lay flat, even if I would have taped it to a board.  Remember, this is just a card. We will glue the heck a doody out of this panel when we mat it, so any remaining warping we will tame with adhesive.


Yeah, you can see I screwed up before, I originally wanted to see how it looked on the rough side of the paper. Just not as crisp as I had wanted.  So, yup, just flip that bad boy over started again!


See how flat that come out?!  Not perfectly flat, but good enough.

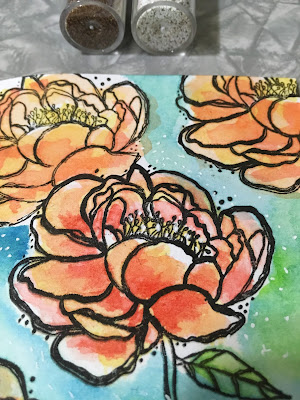
6.  I wanted my focal image to have some pizzazzz.  So, I sprinkled some of the Stampendous Fran-tage chunky embossing powder in the middle of my card.  

I got a little heavy handed with the gold powder, so I remind myself that it's just a card and then I got the urge to do it again, But, "NO". I said to myself,  "IT WILL NOT LAND IN THE SMITHSONIAN, SO LEAVE IT BE!!  Ask my besties.. I talk to myself ALL of the time.

I gave it a good zap from underneath the paper with my heat gun and that stuff melts like budda.
 (oooh, ahhh purdy!)


If you don't have any of the Fran-tage by Stampendous.  Try a gold and white sharpie, paint pen,Wink of Stella, metallic gel pen, even acrylic paint.  Surely you have something in your stash that will give it some texture.

7. Stamped my sentiment on black paper, embossed in white, trimmed down, and torn the one side to reveal the core.  Added faux stitched lines with my Uniball Signo white pen.

8. Assembled my card, by first matting the colored image on black cardstock, then glued some sequins here and there, but not everywhere. GAWD show some restraint!  I then mounted the watercolor panel using 3M foam tape.  Lastly, attached to my card base and finished by adding the sentiment.

9.  Wa-la.  Easy Peasy.  It took you longer to read the tutorial than it will to make this card.

10. Where I went wrong  was that I posted this card to the Unity Show & Tell group.  Look at all the work you girls made me do afterwards. YESH.  

Seriously, I want to see how you girls get along with this tutorial.  Give me a shout out, so I can curse you for one upping me.

Monday, March 6, 2017


I am pleased to announce the following winners from the Growing In Unity prize contest.

  • Merika Cheah
  • Ionabunny
Please message me on FB your Full Name, email and shipping address so I can forward on to Unity. 

A big thanks to everyone who participated and commented during my weekly feature as a Growing In Unity Gal!  

Annie

Saturday, March 4, 2017

Good morning Unity Girls.

Just a quick announcement.  I did indeed select the winners for this week's Growing In Unity prize as promise &  I have sent them over to Unity for verification. (They just want to make sure that the Russians Craft Mafia didn't influence the drawing.)

However, to keep you entertained.  I will provide you with a picture of a pink llama unicorn to ponder.


Seriously, I'm in the process of writing an informative post about different inks.  But, for now. I have to go to a soccer tournament.  All. the live long llama Day.Long.


Friday, March 3, 2017

Growing In Unity Day 5

Whew, it's Friday!  It was pretty touch and go there!

(I'll be honest, I started to write this post on Sunday, Feb 26th.  AFTER brunch- I thought that I needed a liquid encouragement to get my brain cells moving.  Instead, it just made me want to nap! And yeah, the nap will always win out!  I mean, who doesn't like a good Sunday afternoon nap!)

Anyway, I have pretty much exhausted all the fun ways to color Unity Stamps. Sure I could have discussed standard color pencils, graphite, and charcoal.  But, I ran out of time. And who uses charcoal to color in a stamped image for a card or scrapbook page?  You are a better person than me if you do!  However, I did leave time for some non traditional, non-blending coloring supplies. Sharpies.  YES, I did say Sharpies, Gel Pens, and Art Markers.


Unity Stamps:

  • Main Image- Forest of Affection- Possibly my all time favorite image.  These little trees scream happiness to me. But, colored in different tones, they could be perfect for any occasion.
Paper- Smooth Bristol paper. A smooth, heavy weight mixed media paper would work well in these applications as well.


Coloring Mediums-
  • Gel Pens
  • Art Markers
  • Sharpie


Let me preface all this by saying: These mediums take some time to achieve that gradient, color blending look that make Unity stamps stand out even more. However, you can achieve value and shading by using techniques more suited for pen and ink.  For example, hatching, cross hatching, scumbling, contour hatching & stippling. 


Gel Pen- Gel Pens are a popular medium in the coloring book community.  You can find large sets nearly anywhere.  There are a wide variety of colors and effects available.  Sparkle, neon and standard are the most readily available.  The ink does go on smoothly, but can smear on smooth paper if you do not give it time to dry. This type of ink can be difficult to blend smoothly unless you have colors close on the color wheel. Keep your ink strokes all going in the same direction.  Feather the two colors together where the ink colors meet.  The positive is they do add a nice vibrancy and sparkle to any image. Just a side note, make sure you get a good quality gel pen. Lower quality pens come out scratchy and do not flow well.  Spend the extra money and avoid the frustration and gray hairs!

Art Markers- Art markers or any of the standard markers are a great way to lay down a solid color, semi-transparent pigment. They do not blend with water, alcohol or even with a blending pen. The best way to achieve a gradient color is by just adding on more and more layers of  pigment and use one of the techniques I mentioned above. Art markers come in a variety of nibs from bullet to brush tip. The ink in some of these markers work well when you color directly on a rubber image then stamp. If you find the ink dries on the stamp before you can lay down the color onto the paper, just "huff" on the rubber side of the stamp a couple of times.  The moisture from your breath will remoisten the ink. If you don't know how to huff, think of how your breathing is when Unity has a great sale!  Or Brad Pitt nekked.  Mmmm. Brad Pitt nekked.

Sharpie Markers- Now, I know you all think I am crazy, because Sharpie Markers isn't the first supply you think of when you sit down to color a Unity Stamp.  But consider this: Sharpies are a type of alcohol marker.  Now you can't blend them like a Copic or Spectrum Noir marker, but when combined with rubbing alcohol, you can create some interesting textures. Add the alcohol onto a piece of denim or terry cloth towel, press the moistened fabric firmly onto the area of choice, and wait a couple of seconds.  You will see some cool bleaching effects creating some interesting textures. Similar to a standard Art Marker, you can get some decent shading by just adding on additional layers of color.  Just like with an alcohol marker, the ink will bleed though your paper, so take precautions.  Seriously, Sharpies-give them a try.

Could you spot which medium I colored which image with?  I'll admit, none of these are my "go to" art supply, but if you are just starting out, on a limited budget, or are looking for a new medium to master, these supplies may be worth trying.

Final Answer:
Top- Gel Pen
Middle- Artist Marker
Bottom- Sharpie

I'm sad it's Friday and our adventure together is over.  I'm a little disappointed this week was more like a ride on the carousel, and not a rollercoaster , However, I didn't get trampled by a pack of dogs out for an amours time, and you didn't have to say "Bless her heart" too many times.(Well, I hope not anyway).

I also want to thank each and everyone of you for the warm and supportive comments.  Except for you Fallulah. You just bug me.  I am NOT responsible for your new Unity addiction.  

I also want to thank the Growing In Unity girls.  I appreciate the opportunity to share my creations.

As I mentioned EVERYDAY this week.  Please be sure to comment.  It's your ticket into the drawing for an AWESOME Unity prize.  I'll draw names on Saturday!

Thank you all again for the warm welcome & great support.

-Annie


Thursday, March 2, 2017

Growing In Unity Day 4:

Happy Thursday Unity Peeps. Are you folks enjoying this week as much as I am?

I am not sure how much of this information you have found useful. But, It's been fun experimenting with all my stash along the way.  One of the best parts about Unity Stamps is how much fun they are to color.  From small details to large open areas to shade, you can always find an image that suits your preferred coloring medium. Maybe you have a coloring medium that gives you the look you want, or maybe you want to expand your arsenal.  Either way, coloring those wonderful red rubber stamps is always going to be a fun adventure.

Today's coloring comparisons focus's on water as a blending medium. Originally I thought about comparing the differences between the different types of traditional watercolor.  Pan, cake, liquid, powder, or straight from the tube.  But, honestly, there are more differences between quality of paints and pigments than the format in which they come in. But, for the most part, they all react the same way. Paper and water control pay an equal role in the results you will achieve. So, there isn't a lot of comparison to talk about without you wanting to set yourself on fire just for something better to do.
Instead, I will compare similar mediums that are all water reactive. I know, EXCITING!


Unity Stamp:
In My Garden - I just love the size of these images and the versatility of the flowers and stems.

Paper- Just like when you use any other water reactive mediums, watercolor paper is your friend. However, I did use some Mixed Media paper for this application.  You just have to pay attention to your water control, you don't want your paper pilling like that sweater you wore in the 7th grade!


Coloring Mediums
  • Distress Markers
  • Watercolor Brush Pens
  • Watercolor Pencils


Distress Markers- They have all the same properties of  distress ink (see Wednesday for full detail) except the markers are not refillable.  Just like with any marker, you can be precise with where you are laying down color.  That said, markers are not great for making backgrounds where you are applying a lot of color.

Watercolor Brush Pens- This style of marker has a brush nib.  Just like a standard paint brush. There are other versions that do come with a bullet nibs, that I am sure will color much the same way.  The positive of using a brush pen is the variety of brush strokes you can achieve by varying the stroke pressure. (I assume.  I'm really talking out my keister here ).  Another positive is how pigmented the paint is coming out of the barrel.  Premixed, you will get consistent results with each use.  These are easily reactive with water, and you can apply the paint onto a palette then add water for more translucent pigment. The pigment in these pens are very vibrant and the colors blend very well with each other.

Watercolor Pencils-  In my opinion, the best features of watercolor pencils are as follows: 1. The large variety of colors available. Sometimes, you don't have the brain power to premix colors for proper hue and intensity, watercolor pencils are your friend, 2.  Portability; A  handful of pencils, some pre-stamped images & a waterbrush - you are good to color to your hearts content.  Lastly. Colored pencils are great for coloring small detailed images.Sometimes you need a fine point to shade those little pedals on a flower, or the cheeks on an Angie Girl! Unfortunately, colored pencils come with a few challenges as well.  Achieving large gradiated washes is not easy.  There is not an easy way to add pigment to a pallet to create a large wash of color.   You have to pay attention to the pressure when you are applying pigment.  Sometimes you can dent the paper which may not be the look you are going after.  Third, depending on the quality of your paper, you may not be able to liquify all of the pigment, thus leaving behind pencil marks. Erasing mistakes can be a bit of  a challenge here because you are rubbing pigment inside the fibers of the paper, so it can get trapped, unable to be released.  The intriguing part of standard watercolor is the loose translucent color.  For me, watercolor can give you that but,  pencils are more about precision.


Each of these mediums have their specific usages, Which one is best for you?  

Final Results:
Top- Distress Marker
Middle- Watercolor Pencil
Bottom- Watercolor Brush Pens

Don't forget to comment to be entered into the drawing on Saturday for a Unity prize! 2 people will be selected to received some yummy Unity goodness!  

Come back tomorrow- we are going to end the week with a few unexpected mediums!

-A-

p.s #dontdrinkrinsewater


Wednesday, March 1, 2017

Growing In Unity Day 3

I can't believe it's midweek already!  Where has the time gone? I'm happy to report, that so far, I have not dumped any glitter down my shirt. (Trust me, there is still time. But for now, I'm claiming this as a personal victory).   I have however, somehow managed to plant a thumbprint on a card base or two. Luckily I could just hide them under some patterned paper (another small victory!)  How are you kids managing to get through your week? Are you a hot mess, or do you have your poop in a group?!

Today's comparisons are way out of my comfort zone technique wise, making backgrounds. The supplies I'm going to compare today are well suited for this task.


Unity Stamp:
Scattered Pieces  Isn't this stamp set just beautiful.  No one does feathers better than Unity.  The little hearts just make me swoon.

Paper:
140 lb Cold press watercolor Paper.- Please note, you may received different results based on different paper selection.


Coloring Mediums:
  • Spray Ink
  • India Ink
  • Distress Ink

Spray Ink- The fun part of Spray Ink is the spatter patterns you achieve. The unpredictability can be a pro or a con depending on the application. The ink has a matt finish when dry. The overall color of the ink can also be affected by the base paper color.  Spray ink can be used directly from the bottle, or with a brush.  Some brands are more reactive with water, so choose according. You can get interesting results based on the amount of water you add.  However, if using multiple colors, they muddy quickly with excessive amounts of liquid.  Glossy Paper is not compatible with this type of ink.   For those who are more fastidious, spray ink is definitely MESSY, the overspray needs to be considered.  Please beware of the fresh manicure!

India Ink-  A non-traditional coloring medium. One of it's strongest properties is that it is highly pigmented, so the vibrancy is strong even when dried.  On white paper, the ink is semi-transparent and waterproof. When you mix the ink with water or even with rubbing alcohol, you get some interesting blooms.  It is a permanent ink, so you need to pay attention to the application.  India ink only comes in  standard bottles with no brush or dropper.  Definitely a consideration if you want to use it as a spray. The color is definitely staining. You can try and lift some color when it's still wet, but no take-backs or lifting once it has dried.  If you are a go with the flow kind of crafter, this ink can give you some cool results. Pro or con, a little of thins ink goes a long way when mixed with water.

Distress Ink (from a pad)- To state the obvious, you can not spray ink directly onto the paper. You need to use the a squish, spritz and drag technique onto of a craft sheet (or similar) to achieve a marbled/mottled effects.  *See Laura Mooney's tutorials from last week for instruction.
The best attributes of this ink are as follows:  The ink says wet longer. It allows you to blend and shade images. You can lift colors when wet. But, please pay attention to proper water control to avoid mudding mixed colors.  A big positive is that Distress Inks will travel across your paper when wet. Unlike other kinds of ink, the color will not fade when diluted with water.  Its easy applicable with a brush directly from the pad.. Cleanup is a breeze. These inks are designed to work together in layers. So, if you like to experiment with textures and color combinations, this may be your best choice.

Final Answer for which supply I used where:

Top:  Spray Ink
Middle: Distress Ink
Bottom:  India Ink

The overall looks are so similar, but there are some  differences.  I'm not sure if they are significant enough to try and new coloring medium.  What do you think? Do you have something in your stash that will give you similar results?


Don't forget to comment to be entered into the drawing at the end of the week for a Unity prize! 2 people will be selected to received some yummy Unity goodness!  

See you tomorrow!
-Annie


Tuesday, February 28, 2017

Growing in Unity Day 2:

Welcome Unity peeps!  Did we survive Monday with a limp or a gallop?  Did any of you need a little Unity Retail therapy to get you through the day?! If so, I'd love to hear what you bought!

Today's comparison centers around supplies you use more for mix media techniques than card for coloring!  Chalk Pastels, Oil Pastels, and Gelatos.


Unity Stamp:
Beginnings & Growth 

Paper: 
Kraft cardstock-  I wanted to use a type of paper that had a bit of a "tooth" to it.  To make sure this creamy style pigment would grab onto the paper.


Color Mediums-
  • Chalk Pastel- Chalk is an easy way to add pigment onto colored cardstalk.  It blends colors together smoothly.   The softness in appearance is similar to the watercolor looks we went after yesterday, but the opacity makes the coloring stand out on the darker background.  Chalk is easy to apply.  I just used a q-tip.  Sure you could use your finger, but if you color with orange you may mistake the residue on your finger for Cheeto dust.  And trust me, been there.. done that.... Does NOT taste like Cheeto dust!  Let me say also, mistakes are very easy to rub away with a simple eraser.  The downside to using chalk is that you can only add so many layers of pigment before the paper looses its grip and it will no longer add any more color. Mixing colors to create new hues is not possible, unless you crush the pigments together and blend by regrinding the chalk. You can layer colors one on top of the other, but you cant recreate new colors and apply.  (I would love to name new colors for finger nail polish wouldn't you?  What color do you think "Day Old Hangover" would be?)

  • Oil Pastel- This is also fun medium to color images with. Similar to the Chalk, but the pigment is much richer. Standard Oil Pastels do not react with water.  Adding pigments to smaller spaces is a bit of a challenge, but is possible with a small brush or a fine tipped applicator. You can create smooth textures and shadows by just blending colors together.  The downside to using Oil pastel crayons is the colors can smear out of place if you are not careful.  Oil is non reactive with water, so any texture you achieve is based on how much pigment you initially apply.  A simple gentle swipe of the pastel will give you a dry brush effect.  Whereas adding a heavy layer will give the color a solid appearance. The biggest negative quality to the oil pastel, is permanency.  Once you lay down pigment, it's there. No erasing mistakes. And girls, let me say. I make enough mistakes that will live on FOR- EVER.  I need to eliminate all the little ones I can!

  • Gelatos /watercolor crayons /or water reactive oil pastels - Most watercolor crayons are water reactive, says so right in their name.  However, for this demonstration, I only used the pigment dry.  I smudged the color on selectively, and filled the image in using a Q-tip. Similar to the oil based pastels, the application can be a bit tricky in small spaces, but the pigment is easy to move around.  If you use Gelatos and add water, the luminosity onto straight kraft cardstock does diminish considerably, that is why I like this technique in its dry form. One plus to this medium is you can erase mistakes by diluting with water.  (*Pay attention, some brands are more glittery, while you can "erase the pigment' the glitter remains.)  In a dry application, backgrounds are more challenging.  I'm sure it's user error for me.  But, I found the dry use of the pigment to be splotchy.  
Final results- Can you tell which medium I used on which card?  

Top- Chalk pastel
Middle- Gelatos
Bottom- Oil pastel.

Do you think this was a fair assessment?    What is your experience with these supplies?  I'd love to hear your thoughts.  Unless you disagree with me, and then, you know..go lick some chalk pastels, and keep your opinions to yourself!  LOL.

Don't forget to comment to be entered into the drawing on Saturday for a Unity prize! 2 people will be selected to received some yummy Unity goodness!  

See you tomorrow!
-A

Monday, February 27, 2017

Growing in Unity Day 1:

I'm so excited to get started with Day One of being a Growing in Unity Girl! I am beyond honored that I was selected.  Sure, I raised my hand when no one else was looking, but the feeling is the same! However, reality hit pretty hard about 2 minutes after I got the call up and quite a bit of panic set in. Now what are you going to show them?!  Seriously, the only sound I heard for a good 30 seconds was the noise that the old school dial up internet made when you first connected.  (If you do not distinctly remember that sound we can never be friends.. you are too dang young).

Once the fog cleared from my brain, I realized I wanted to showcase how I color my Unity Stamps. Then my brain went to which method?!  Copics, Pit Pens, Distress inks, colored pencils, watercolors...... the possibilities for coloring Unity Stamps are endless. Therefore, my goal this week is to walk you through the different types of coloring mediums. Not necessarily a coloring tutorial, but more comparing and contrasting the end result.  I'll try and compare supplies apples to apples, but I might mix a pineapple in there just because I can.  If you have specific questions how I colored something or which specific supplies I used, I'll be more than happy to answer them.  I am no way claiming to be an expert on coloring, but I can answer some general questions to set you on the right path.


Unity Stamps:

Paper- it's all about the paper.  Ok, it's some about the paper, some about the medium, a lot about your technique.  Really, I don't know the rations exactly; and I could be talking out my keister here. (Now is a good time to say "Bless her heart ". ) Using the correct type of paper for a specific medium is critical for the result, I do believe that.  Not as much as I believe in Santa Claus, but enough to write about it here.

  • Markers used on smooth cardstock
  • Water mediums- 140 lb Cold press paper


 Mediums to compare today-
  • Alcohol Markers
  • Watercolor 
  • Water Soluble ink pencil

 As you can see.  Easy type of medium gave a different appearance.  Can you tell which one is which?


Color Mediums:

Alcohol Markers are definitely easier to control.  The color of the pigment is easy to blend.  But, they don't necessarily give you the translucency that watercolor provides.  Generally speaking, once you lay down your color it takes a bit of effort using a blending pen to "erase" any mistakes. Consistency in the amount of color that is released is an asset here. The color will be the same if you lay down a layer of ink now, or you come back two days from now.  You can achieve some great effects using the blending pen, or just simple rubbing alcohol. I'll be honest, you are going to lay down a good bit of ink to get a smooth background.  That can be a challenge even for the skilled artist.

Watercolor is great for laying down layers and layers of translucent pigment.  The process takes a bit more time, because you have to wait for each layer to dry.  Correcting mistakes is much easier to manage (at least while the paint is still wet). Background are so easy to achieve with a few swipes of a paint brush. Water control is your biggest challenge here.  Too much water and you dilute the pigment, too little and the color balance is off.  Maintaining consistent color blends can be difficult.  
However, the versatility of watercolor is unmatched.  Strong vibrant colors, cool soft colors all can be achieved by the amount of water you use! Most people will tell you watercolor has a mind of its own You decide if that's a pro or a con!

Water Soluble Ink Pencils are the easiest to use out of these three.  Just like a colored pencil. Great for getting into tight spaces, or use on small images.  Can be used dry or wet.  But, the pigment is more difficult to control when wet, and once the ink dries, there is no correcting mistakes. Furthermore, there isn't a lot of erasing the pencil marks prior to the ink being activated.  So, maybe not your best choice after a glass of wine or two.. (I don't judge drinking and coloring activities- just know you have to have a steady hand while in use! ) Personally, I have a limited palette, but just through layering, I was able to achieve similar results.   The water soluble ink takes more practice to mix multiple colors together, ( you have to mix them wet on a non-porous surface first). Then there are all of the challenges associated with water control.  Creating smooth background requires a bit of practice to avoid any splotchiness.

Which method do you prefer?  Do you need to run out an get a new coloring implement?  Or do you have something in your stash that will give you similar results? 

If you are still unsure which image I colored with which product the answers are as follows:

  • Top- Watercolor
  • Middle- Water Soluble Ink Pencils
  • Bottom- Copic
Which comparisons are we looking at tomorrow?  You better just come back and see!

Don't forget to comment and enter yourself into the drawing for a prize pack from Unity.  2 Winners will be selected from this weeks entries on Saturday.

-A.

Growing In Unity Girl- A little bit about me.

Hello, my name is Annie Sterner, your friendly Growing In Unity newb this week.  ((waiving hello))
I’m super excited to throw myself into the deep end of sharing with you my “talents” (trust me, I use that term very loosely!) What I can say is I try hard.  And most importantly, I do not take myself seriously at all! I’m a go with the flow kind of gal.  Life has taught me that much.   The basics about me:  I’m a mom, a wife, I work.  I encompass all the BORING parts of adulting.  But, what you really need to know about me, (what I am morally obligated to share with you before we start this craft adventure): I’m always one moment away from appearing on the nightly news. 

“This just in, local Denver woman lands in the hospital for near drowning as a large pack of rogue dogs knocked her down and dry hum…. Uh, cuddled, yeah..amorously cuddled her in front of the Pope. First responders turned fire hose on dogs in rescue attempt.  Pope sped away in bubble car before he could be reached for further comment. More at 11.”

You think, I’m kidding- but, this is my life. Weird things just happen either to me, or around me. It’s true, ask my friends.  And yes, I have friends.  Not sure why they stick around. But hey just like those frisky dogs, I have found a good set of legs and I’m not letting go until I get sprayed with a fire hose

My crafting style is much the same way, things just sorta happen over here.  I either create a masterpiece, or I end up spilling both the large bottle of tacky glue and the jar of ultra fine glitter down my shirt. I then spend the next 48 hours explaining to my husband why our dinner sparkles.  Let’s just get real, I’m a hot mess. I get that.  Unity keeps my hot mess moments at bay, but I take nothing for granted.  Should Karma come a knocking this week, and I find myself being trampled by that pack of dogs again, your best comments are   “Bless your heart” ,  “Oh how fun”,  or my personal favorite, the one my husband uses  EVERY TIME  I show him my crafty creations…  “That’s nice.”  You all know the tone of “That’s Nice.” It’s the same tone you give to your Aunt Gladys when she buys you nylon underpants for Christmas.

But, hey- It’s all about the journey right? I can’t promise you masterpieces, or a clear outline of where we are going this week, but it will be an adventure for sure!

Sunday, February 26, 2017

Unity Stamp- Missing You Girl

Been busy this weekend working on a blog project.  Found some scrap paper, and one of my newest Unity Stamp.  "Missing You Girl".


Monday, February 20, 2017

It's been a long absence from blogging.  Not much has changed over the years.  New room, same old desk.  Maybe a few more supplies to talk about.